Avid Tip: Ugly fonts in Media Composer 6

When I first installed Avid Media Composer 6, I ran into an issue where the main Avid UI application font was horribly ugly. It was low rez, unsmoothed, and had awful kerning. Like this:

Ugly aliased badly-kerned fonts Ugly aliased badly-kerned fonts
Ugly aliased badly-kerned fonts. Notice how not all text is ugly

It turns out this is a known problem with a simple solution.

In case that link ever dies, here’s the info:

Quit MC and run the enableFontSmoothing script in the Applications > Utilities > Avid Utilities > AppleFontSmoothing folder. I think you just double-click on it for it to work. Then you can launch MC again.

Or if you feel comfortable using the Terminal (and this is what I used successfully), quit MC and launch the Terminal. Then execute the following command:

defaults -currentHost write -globalDomain AppleFontSmoothing -int 1

Hit Return and quit the Terminal, then relaunch MC. The value of 1 at the end should fix the issue (it did for me) but it was also suggested to try 2 or 3 if you still see an issue. Executing the command with 0 resets to the default.

This is a permanent change (you don't have to re-execute the command on system startup) and should solve the font issue.

Here’s what mine looks like afterward:

CAPTIONCAPTION
Nice smoothed fonts. Still somewhat crappy kerning.

Thanks to Kevin Klimek on the Avid forums for posting this solution

Building an Online Suite: Mac Pro Card Slot Fun

In creating my online suite, I am attempting a feat which many say cannot be done: creating a system that can run both Avid and Final Cut. Furthermore, I wanted to have Avid and Final Cut hardware installed on the same machine — Mojo DX for Avid and AJA Kona for Final Cut.

This type of hybrid system is not for the faint of heart. Video editing is a high-performance activity, and the editing packages are very picky about what software is installed, which versions, and how the hardware is set up. I was able to get everything running fairly easily, but the question is, is it running well or just limping along?

For instance, when I first set up the system, I thought everything was working just fine. Avid was working handsomely, Final Cut seemed to be working ok, and my disk benchmarks showed that my hard drives were working very quickly. However, I found out that external video playback in Final Cut was very poor. The video image on my external monitor would lag behind the desktop window by several seconds. This evening, I discovered that I couldn’t capture more than 2 minutes of high-quality video (1080i uncompressed) into Avid without throwing up an error. Clearly, the two sides of this black and white cookie were not getting along ((That’s right, I’m making a goddamn Seinfeld reference.)).

Both of these problems stemmed from hardware issues, specifically card slot configuration. The Mac has four slots inside it where one can install hardware cards. Two slots are extra-fast “16x” slots. The others are slower “4x” slots. But even then the two 16x slots are meant for different things. For instance, Slot 1 is for the graphics card. And tonight I found out that the 4x slots aren’t identical either.

Because of all the hardware I have (3 additional cards), there are 6 possible combinations for how I can install them. Trying each combination entails 15-20 minutes of rearranging cables and fastening tiny screws, and then another 15-20 minutes of testing. This is on top of the hours of troubleshooting to discover that, in fact, card slot arrangement was the source of my problems.

At this point I feel like I’ve tried all six. My first arrangement was like this:

  1. 16x: Graphics
  2. 16x: RAID
  3. 4x: Kona
  4. 4x: Mojo

Both the Kona and Mojo claim to be 4x devices, so I put them in the 4x slots. I wanted my storage to be as fast as possible, so I put that in the 16x slot.

But, I was getting these problems. Working with my colleagues on twitter, I discovered that the Kona card really wanted to be installed in Slot 2. Once I moved it there, my monitor playback in Final Cut was fixed. So for a couple months, I’ve had the cards arranged like this:

  1. 16x: Graphics
  2. 16x: Kona
  3. 4x: Mojo
  4. 4x: RAID

But then, my Avid problems. Well tonight, I found an obscure document that revealed that the Mojo card wants to be in Slot 2 or 4. Of course since I had it in slot 3, I had to move it again:

  1. 16x: Graphics
  2. 16x: Kona
  3. 4x: RAID
  4. 4x: Mojo

Now, finally, I think I’ve nailed the right order. Avid is able to capture long clips in high quality, Final Cut plays back correctly, my RAID is still reporting very high read and write speeds, and nothing else has exploded (yet).

Moral of the story: If you can afford to have separate machines for Avid and Final cut, yeah, it’s probably wise to do it that way. I wouldn’t want to pay myself for the hours I’ve put in to fixing these issues. But for those adventurous-types, combining the two is not impossible.

Building an Online Suite: Almost done

Aside from the desk and some simple things like an end table and filing cabinet, my edit suite is done. I’ve already had one client in to do an HDCAM output, and other than my own ignorance of 720p issues, everything worked as expected. Other than my desk, I just need to take care of various paperwork and my company website.

The room turned out just like I wanted. It’s nice and quiet inside the edit suite, and the light is pleasing. All the equipment is hidden in the next room where I can get at it easily. One sucky thing is that I don’t have a rack, so inputs and outputs are spread across the back of the Mac Pro tower, the Mojo DX, and the loose Kona cables. I can probably solve that problem with some short BNC cables and female / female adapters. Then I’ll have short extension cables that I can bundle together and hook up as necessary without crawling around the back of the machines.

Everything up and running, still on a cheap desk
closer up image of work area
equipment in the next room
equipment in the next room, connected to HDCAM deck off-screen

Designing an online edit suite: An alternative desk

My last post was a good attempt at brainstorming how my new video editing desk should look. Unfortunately, the guy at Home Depot constructed the quote incorrectly, and didn’t include a 7.50$ charge for every linear foot of countertop for finishing the edges. Using the correct numbers, my previous design would cost 400$ more than I thought.

That put the price was back up to 1000$, which is just too high for a self-built desk. It was time to rethink the complicated concept of the strangely-shaped desk with wings. I recently went back to Powderhouse to do some work in their online suite where they just have a basic rectangular desk that’s 7 feet wide and 3 feet deep with a riser. I’ve been using that desk for close to four years now, and despite the square shape it works well.

The only problem with that desk is I can’t rotate the CC monitor as far as I’d like. It’s an older CRT model (( “Older” does not mean “out of date.”CRT monitors are still considered the best for color correction because they produce extremely dark blacks, but they just aren’t manufactured any more.)), and CRT monitors are big, heavy cubes. The riser is 18” deep, but even that depth isn’t enough to rotate the monitor properly. As I spin the monitor, the feet on the bottom quickly fall off the edges of the riser. I won’t have that problem in my suite because my CC monitor will be a shallow LCD panel on a swiveling base. I went home and created a new, simpler design nearly identical to what I’d been using at Powderhouse. Using the new, more accurate numbers I had from Home Depot, I got a total price of $600 or so.

About this time, another option presented itself. Char told me that just up the road was a furniture liquidators store — they have thousands of square feet of warehouse space and buy old cubes and desks from companies for reselling. Although standard office furniture doesn’t work right for me, the company also fulfills custom quotes. I took a short drive up the street ((it was very cold, or else I could have walked)) and worked with the nice woman at the warehouse to draw up a design. What I got back was just what I wanted — the desk I’d been using all this time:

Custom desk design
Custom desk design

The price was higher than the Home Depot + Ikea option, but not by much, and I wouldn’t have to attach the legs or construct the riser myself. I only had a vague plan for nailing lengths of shelving together to make the riser, so having it included was a big plus. Furthermore, it’s a real desk, not a homebrew combination of countertops, legs, and lumber. It will be all black with matching legs. So I ordered the custom desk. It won’t be ready until the end of January, but it’ll be worth the wait.

Eventually I will need at least one side desk, but I’ve decided I can wait until the last minute to buy it. Unlike huge, editing-specific desks, small desks are a dime a dozen and can be had everywhere. When I need one, I’ll stop by Staples or Ikea and get it.

Designing an online edit suite, Part 2: Furniture and Space

This is my second post about my plans to construct an online editing and color correction suite for my own work.

As I suspected, this designed changed and the quote below is inaccurate. So, please disregard the plans contained within. Instead, check out the final desk I decided to purchase

Last time I talked about what computer equipment I would probably need in my edit suite. Now that I’ve got all this great (hypothetical) hardware, where do I put everything? I could just get a cheap desk and a folding chair, but that’s the wrong way to go. I need to work efficiently, and a plain rectangular desk is not the right shape for working with three monitors, a keyboard, and a tablet. I also can’t cheap out on the chair unless I want to get carpal tunnel syndrome.

I also have other reasons for not skimping on furniture. For a production, online editing and color correction are some of the highest dollar-per-hour expenses. The equipment is expensive, the labor is highly-skilled (IMHO), and the time-frame per job is short. Clients rightly want to feel like they’re getting their money’s worth. It’s hard to see where that money is going if the equipment is in another room, and watching someone use a computer is notoriously boring.

This expense is why million-dollar online rooms have track lighting, espresso machines, and leather couches. It’s similar to the broken-windows theory ((see also this dutch study.)). If I have a cheap desk and a broken couch, that implies I take the same attitude toward my hardware purchases — it’s probably a bunch of half-working cobbled-together junk. Sure, I could charge the client less if I didn’t spend so much on the decor, but the percentage of the budget spent on furniture is small compared to the hardware and software. Physical goods are more cost-effective than electronic, so a smaller amount of money goes a longer way.

The Desk

The most expensive piece of furniture is The Desk. Entire companies exist just for making media desks and furniture. These desks are very nice. They curve around, so the operator can look directly at all the monitors. They have risers, which provides more space for mixers, consoles, and other gadgets. They are also really, really expensive, like $3000+.

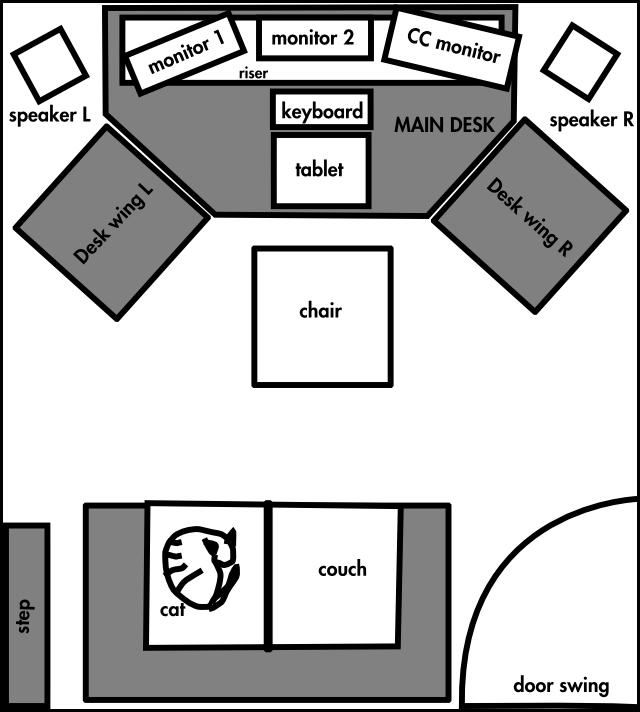
I want to hit a sweet spot — not a regular rectangular craigslist desk, but not a crazy-expensive professional media desk. My best option is to build it myself. I don’t have a CAD program, but I do have a vector-graphics program called Inkscape that is similar to Illustrator. I set my units to inches, and simply drew the room with a desk in it:

Desk drawing

For the monitors, tablet, keyboard, and chair, I drew rectangles the same size as the items themselves. I let these objects determine the size of the desk. Right now the space between the chair and the couch looks a little tight, but the couch and door are estimations ((Char insisted I include the cat for scale)). The speakers are shown free-standing, but I may end up just putting them on the desk.

I wanted to get the wrap-around effect using simple shapes, so I started with a rectangular top and chopped the corners off. Then I can make two smaller wings that fit flush onto the diagonal sides. The wings may have four legs (so they can move), or I might give them only two legs and have them attach to the main desk. The riser consists of a simple bookshelf with some more board screwed and glued to elevate it.

I went to Home Depot ((I’m not even going to link to their web site, it’s worthless)), and found they can make a custom countertop with a simple flat black finish for 14$ a square foot. I can get them to make the tops and then attach adjustable-height legs from Ikea to complete the desk. Adding everything up, this is what I get:

Note: I haven’t built this desk, so I may discover that the legs are no good or the particleboard counter needs reinforcement. This post is not sound construction advice.
Desk Tops:
per sqft w h
Main Desk $248.76 $13.82 72 36
Desk Wing L $55.28 $13.82 24 24
Desk Wing R $55.28 $13.82 24 24
Legs:
per leg # of legs
Main Desk $90.00 $15.00 6
Desk Wing L $30.00 $15.00 2
Desk Wing R $30.00 $15.00 2
Main Desk Riser:


Regular shelf $14.00
wood to rise $10.00
Main Desk Total $362.76
Single Desk Wing Total $85.28
Subtotal $533.32
Tax $26.67
Total: $559.99

Is 560$ too much to pay for a good desk? It’s half the lowest price I’ve been quoted for either professional edit furniture ($3000) or a custom-made birch desk ($1000). It’s only 5% of the cost of the rest of the editing suite.

Other than the desk, there are a few other basic things I will need, all of which I can get for free or are inexpensive:

  • Couch: I may have access to a free loveseat, and if it’s presentable and comfortable I’ll use that. Otherwise, Ikea to the rescue again!
  • Main lighting: I will probably bring my nice floor lamp from home, where I’m not really using it
  • Back lighting: I just need a small fixture to aim at the wall. This can be inexpensive because it’s hidden

The nice thing about this room is that the server room is on the other side of the wall. This means I can run the cables through the wall and put all of the computers with their loud, whiny fans in there, keeping the online room quiet.

Designing an online edit suite, Part 1: Can I Afford It?

This is the first in a series of posts I’m planning that will cover the budgeting, design, and possibly even construction of my own online editing suite. The whole plan could fall apart if the income doesn’t justify the cost, but my preliminary spreadsheet-fiddling has been promising.

I left a staff position in September to become a freelance editor, and while I’m happy I made the switch, there’s one big problem I have: I don’t have my own editing suite. All I have is a copy of Avid that I use to edit my reel, and for basic editing that works fine. But the work I get paid for is color correction and online editing, and a dinky laptop is not powerful enough to handle that type of work.

So far I’ve been able to work around the problem by using my clients’ equipment. I have a tablet and monitor calibrator that I bring to the gig, and I spend a few minutes getting everything set up. Even so, this means the color is inconsistent because I use a different monitor every time, and often the process is slowed down because the system I’m using isn’t fast enough. And frankly, I’m picky about ergonomics, so I get frustrated when the chair is uncomfortable or when the light isn’t right. To do this work properly, I really need my own edit suite.

First and foremost, a fully-equipped online editing system is expensive. Can I get enough work to afford it? If I buy the system, will that allow me to do more work, or will I have to raise my rates to pay for it and therefore price myself out of the market? Taking advice from my girlfriend, I’m not going to let the price of the system determine how much work I need to bring in. I will try first to figure out how much work I can get, then see if that’s enough to pay the expenses. If the numbers don’t work, then I can’t afford the system.

Tasks

To know what I need to buy, I need to know exactly what I’m going to be using the system for. Based on the past couple months, I will continue finishing and grading independent projects in Final Cut and Apple Color, possibly outputting to various tape formats. I do not foresee working with high-res 2K 4:4:4 images, so I don’t need a super-fast RAID or the highest-end Kona card. Similarly, I’m not doing audio mixing, so while I don’t want tiny computer speakers, they don’t need to be stellar.

Taking all of this into account, I specced out the following system ((I’ve added links for price reference, but I will probably buy the whole package through my local reseller)):

Hardware
Mac Pro tower (dual-quad 3.0GHZ w/ 8g 3rdparty RAM) $4,000.00
Samsung 22” monitor $260.00
HP DreamColor monitor $2,500.00
E-SATA external 1TB drive $120.00
E-SATA cable and bracket $30.00
AJA KonaLH I/O card $1,300.00
Blackmagic Sync Generator $300.00
Wacom Tablet $500.00
Mouse and pad ((I love these mice. They feel great, are cheap, and last forever)) $23.00
Blue Sky 2.1 speakers $350.00
Behringer Audio Mixer $60.00
Power strip / cables $20.00
Software
Final Cut Studio $1,130.00
Magic Bullet Looks $400.00
Already invested $900.00
Total Additional Necessary
$10,093.00

This is just a rough back-of-the-envelope calculation. It does not include tax and shipping, for instance. But it serves to get me in the ballpark — 10 grand. That 10 grand, spread out over the lifetime of the various parts, comes to about 3700$/year that this system needs to bring in to justify itself.

There are choices I’ve made that might be surprising: is a DreamColor really good enough for professional color grading work? Is 1TB of un-RAIDed storage a good idea? Should I get an Avid Mojo DX so I can finish in Avid as well? Or should I just get The Duck?

Based on my experience, the DreamColor is a big step forward for LCD reference monitoring. It’s no high-end CRT, but for the price range I’m targeting it’s great. For most indie projects, 1TB of storage will be fine. As long as I back up project files, I’ll be working on duplicated media anyway. If the drive should die, the client will still have their own files. As for Avid compatibility, that’s up to the work I can get. Right now everyone is using FCP. But if I have to turn away Avid customers, I’ll have to consider the Duck or a Mojo DX.

What if I want to take it to the next level, though? What if I want to do Avid work, and uncompressed HD work? I’m going to need to add equipment:

Hardware
Second Monitor $260.00
LifeZero 4TB RAID $2,000.00
Upgrade to Kona3 $1,200.00
Blackmagic SDI to HDMI converter ((So that, with the Mojo, I can use the DreamColor as a reference monitor)) $500.00
Avid Mojo DX $7,500.00
Additional Cost $11,460.00

Ouch, double the cost. Have I complained yet about the high cost of Avid equipment? It’s really tough to justify a Mojo DX unless I get a big contract or something.

Now that I have an idea of what the system looks like, what about where to put it? There’s more to a suite than the hardware and software. My next post will cover room design, desks, and other environmental considerations.

Avid, LEAVE MY LEVELS ALOOOOOOOOOONNNNEE!

Avid has posted a little tutorial on how to export and import quicktimes “correctly.” After reading it several times, I noticed that the author doesn’t cover what I think is the most important use-case: I would like to export video and not touch the levels at all. And then I would like to import it, and not touch the levels at all. Leave my levels alone! Don’t clip them, don’t make them colorsafe. My job as the online editor is to make the show broadcast-safe, and I don’t need the “help”. When Avid screws with my levels, it makes it impossible to roundtrip between Avid and Shake so I can do vfx work.

Thanks to this article, however, I think I finally understand what the Color Levels options in Avid mean:

  • “RGB”: This material I am importing or exporting is EVIL RGB, and needs to be fixed to proper broadcast safety. Please Avid, I am incapable of using a color corrector, won’t you squish (RGB option) or clip (RGB source) my levels for me?
  • “601/709”: LEAVE MY LEVELS ALOOOOONNNEEE. I’ll do my own correction, thanks!

If you select 601/709 everywhere you can, Avid won’t touch your levels and will preserve the full range of the image. I have confirmed this by exporting a dozen files with all sorts of settings. I was able to make the process work two ways:

  • Avid codecs using Format Settings / Video Settings / Options / Color Input: 601/709, and Color Levels: 601/709, then importing 601/709
  • Animation codec with Color Levels: 601/709 and importing 601/709

With the Avid codecs, selecting Color Input: RGB clips data off the top and bottom, and selecting Color Levels: RGB squishes the levels to broadcast safe without clipping.

I have been exporting and importing files incorrectly for years. Along with alpha channels, importing and exporting in Avid is insanely complex. Having backwards alpha channels doesn’t help. This needs to be fixed. Here is how these options should read:

  • Color Levels: Maintain color levels
  • Color Levels: Import as broadcast-safe

Converting Varicam 48fps to 24p

Warning, technical video post production post ahead.

A few weeks back we needed to shoot some greenscreen for a show that is being delivered at 23.98fps (aka “24p”). I’d had problems pulling a key in the past with motion blur at that slow framerate (I prefer 30 for TV work), so I suggested we increase the shutter speed in the camera. The DP seemed more comfortable adjusting the framerate, so he suggested we shoot it at 48 and only use every other frame of the footage. I figured I could write a script to do the conversion later.

We shot the footage, and the next week I sat down to write a python program to convert the material to 24 fps. This could have probably been done with final cut or something, but I don’t know that program so I did it the easy way: play around with the frames themselves using an image sequence (ie, a big folder of numbered tif files, each of which represents a frame of footage).

Normally this would be easy, just take every odd-numbered image. But in this case, although we shot at 48fps, the footage is at 60fps. Why? Varicam works like this: the front of the camera (the shutter and CCD) shoot whatever framerate you choose, but the tape recorder in the camera always records 60fps. Even if you shoot 6fps, the varicam writes 60 frames to the tape — 10 of frame 1, 10 of frame 2, etc. So when we shoot 48fps, there are 60 frames per second on the tape, 48 of which are unique and 12 of which are duplicates.

If I am going to convert the footage to 24p, I need to first remove the duplicate frames (60 -> 48 fps), then remove every other frame (48 -> 24). By analyzing the footage frame by frame, I determined that when the varicam shoots 48fps, it uses the following pattern:

0000100001000010001

Where 0 represents a unique frame, and 1 represents a duplicated frame (to fill out to 60fps). This pattern is repeated over and over again throughout the footage. (I only just noticed that the pattern is 19 frames long, not 20 like I’d expect, but looking at the footage that’s what it is.)

My python program goes through an image sequence, finds the pattern of duplicate frames, and then copies every other file that is not a duplicate to a new folder as a new image sequence. It makes the following assumptions: the files are .tif files, and “duplicate frame” means “exactly the same size” (not a bad assumption with digital media and tifs). It’s a little hacky, but looking at the resulting 24fps image sequences I don’t see any stutter or dropped frames.

There are some basic checks in the code so it hopefully won’t overwrite precious data, but I make no guarantees.

Code: 48-to-24.py

Avid Symphony Nitris – hope you like progress bars

It’s one thing putting up with Avid because of their kludgy made-it-up-as-they-went interface. I’ll grant that video editors are not particularly technical people, so the cost of modernizing the UI wouldn’t be worth the retraining costs.

But if we pay 90,000$ for the best Avid editing station, which includes 4,000$ for a quad-core Xeon workstation, it should bloody well use more than one processor at once when rendering effects:

If your code is so old and krufty that you can’t support multiple processors for something as simple as effects or video encoding, it’s time for a rewrite.